These Sugar Cookie Peppermint Truffle Tarts are filled with velvety, rich peppermint truffle cream—perfect for your next holiday party!

On a cold and dreary night last winter, I found myself panicking. It was my turn to host my monthly book club, and I had absolutely nothing to serve. I wracked my brain, trying to come up with the perfect treat to serve to my book club friends. I finally landed on this recipe for sugar cookie peppermint truffle tarts, and boy am I glad I did! These holiday-themed sweets were a huge hit with my fellow book club members, and this has become a dish that they now request all year round.
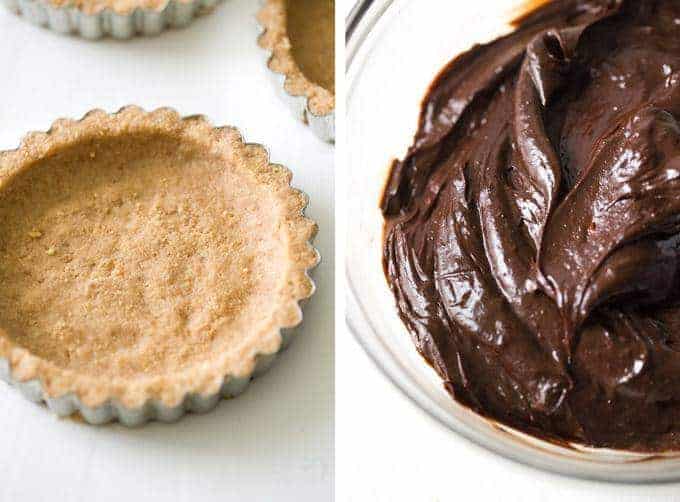
Each tart begins with a buttery crust that’s made from a gluten-free sugar cookie mix. The tart filling is a dreamy mix of avocado, peppermint extract, and cocoa powder. A layer of melted chocolate garnished with crushed candy canes rounds out this delicious recipe.
As a busy working woman, I’m always looking for recipes that are straightforward to prepare and designed to impress. This tart recipe checks all my boxes—it’s seasonal, simple, and indulgent. If you’re looking for the next best thing to serve at a holiday gathering, why not give this recipe a try?
Are Sugar Cookie Peppermint Truffle Tarts Healthy?
Like most indulgent holiday treats, these tarts are a dish that’s best enjoyed in moderation. But unlike conventional goodie recipes, this tart recipe calls for a number of nutrient-rich ingredients. Avocados are an excellent source of fiber and healthy monounsaturated fats, and they also contain vitamins like vitamin C and vitamin B6. Unsweetened cocoa powder is packed with flavonoids and contains iron. This recipe also calls for a gluten-free sugar cookie mix, making it suitable for individuals with wheat allergies or sensitivities. If you’re looking to adjust this recipe for non-dairy diet plans, you can replace the butter with a vegan butter alternative or coconut oil. You can also use dairy-free chocolate chips and sugar cookie mix. To reduce the sugar content in this dish, make sure to choose a sugar cookie mix that contains little or no added sugar. You can also opt for sugar-free chocolate chips and candy canes.

Exploring The Rich History Of Candy Canes
Today, candy canes are a familiar sight during the holidays in places all around the world. But did you know that these sweet treats have actually been around for hundreds of years? Historians believe that the first candy canes originated in 17th-century Germany, where white sugar sticks were bent into “J” shapes reminiscent of shepherd’s crooks. The familiar peppermint flavor of candy canes didn’t come about until the early 20th century in the United States. It was during this period that candy canes were made with their now-classic red stripes and peppermint flavor. Around this time, people also started using candy canes as Christmas tree decorations. Their hooks make these sweets easy to hang on tree branches, and they have since become a staple for holiday decor across the globe.

How Do I Store Leftovers?
To store any remaining tarts, first place your leftovers in an airtight container or wrap them tightly with plastic wrap. You can store these leftovers in the fridge for up to 5 days. If you prefer to store them longer, you can also freeze them for up to 1 month. Just make sure to let your frozen tarts thaw in the fridge overnight before you tuck in.
Serving Suggestions
If you’re serving these tarts on their own as a tasty dessert, you could serve them alongside a mug of Vegan Hot Chocolate or a glass of homemade oat milk. Looking for dessert pairings that will wow your guests? Consider serving these Chocolate Peppermint Cheesecake Cups or this Skillet Peppermint Vegan Brownie.

Ingredients
To Make The Tarts:
- 3/4 cup + 1 tablespoon softened butter divided
- 1 package of gluten-free sugar cookie mix
- 1 egg
For The Filling:
- 3/4 cup avocado mashed
- 1/2 cup + 1 tablespoon unsweetened cocoa powder
- 3/4 teaspoon vanilla extract
- 1/2 teaspoon peppermint extract
- 1 cup milk chocolate chips melted
- Crushed candy canes for garnish
Instructions
- Heat your oven to 350°F and lightly grease 2 cookie sheets.
- In a large bowl, combine the softened butter, cookie mix, and egg. Stir together until a soft dough forms.
- Place the dough between 2 sheets of parchment paper and roll out about 1/4-inch thick.
- Cut the cookies into whatever shapes desired and place on the prepared baking sheets. Bake until the edges of the cookies just begin to go golden brown, about 10-12 minutes. Let cool completely.

- Once cooled, add the cookies into a large food processor and crush until they form fine crumbs.
- Measure out 2 packed cups of the crumbs and pour them into a large bowl. Add in the remaining 5 tablespoons of softened butter and use your hands to combine until crumbs form.
- Place about 6 tablespoons of the crumbs into 4 tart shells and press down evenly. You want the base of the tart to be thin, with nice thick sides to ensure that they won't crack off when the tarts are baked.
- Bake until the tarts are lightly golden brown, about 13-14 minutes. Let cool completely.
- Once cooled, place the avocado into a food processor and blend until smooth. Add in all the remaining ingredients, up to the candy canes, and process until smooth and well combined.
- Divide the filling evenly between the tart shells, spreading out gently. Sprinkle with crushed candy canes.
- Place into the refrigerator until set, at least 2 hours.
- Enjoy!
Nutrition Info:
Nutrition information are estimates only and may vary based on the specific brands, ingredients, and portion sizes you use. This data is provided for informational purposes only.


Leave a Comment